
How to Build a Randall

Looking for an easy way to take your base beer and experiment with different hops and adjuncts?
Interested in giving your beer an extra punch of hop flavor and aroma?
I know a guy named Randall who can help you out.
Who is Randall?
Invented by the brilliant minds at Dogfish Head back in 2002, Randall the Enamel Animal is an “organoleptic hop transducer module.” In other words, it’s a device (not a guy) that infuses flavors and aromas from various ingredients into a finished beer as it travels from the keg to your cup.
What sets the Randall design apart from other infusion methods such as late additions, whirlpooling, and dry hopping or fruiting is you’re not affecting the entire batch of beer (unless you want to). You’re affecting however much of the batch you want to affect.
Here’s the official Randall as designed by Dogfish Head. It’s awesome but also expensive and more suited for commercial use. Dogfish Head quickly saw the opportunity at the homebrew scale and thus the Randall Jr. was born. It’s basically a small plastic container with a filter at the top like a french press.
Randall Jrs. and french presses work pretty well in this application, but in the spirit of DIY and maybe a little showmanship, we want to build a REAL Randall!
Single Chamber Randalls
Most of the DIY builds out there are based on the original single chamber design. Beer flows in through the top of a water filter chamber, flows down through the ingredients, into a tube with some sort of filter, up the tube and out of the chamber to your glass.
I built my Randall according to the Maltose Falcons Hash Back design (also found in the January/February 2015 edition of Zymurgy magazine, and Experimental Homebrewing by Denny Conn and Drew Beechum). I love this design because it’s easy to build, cost effective, and it works well.
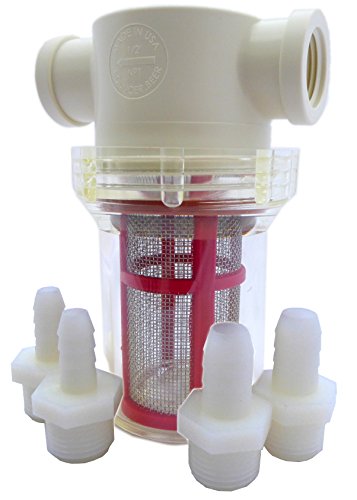
The Parts
Since that article was written, a new Pentek water filter was built with 1/4″ threads, so there’s no need to buy reducers. Here’s an updated parts list with links:
- 1 x Pentek 1/4in. #10 Slim Line Clear Filter Housing
- 1 x Stainless Steel 316L Tubing, 1/2″ OD, 12” Length
- 2 x Stainless Steel 1/4″ Male Flare Threads for quick disconnects
- Alternatively, you could use 1/4″ Hose Barb Connectors if you don’t have or don’t want to use quick disconnects
- 1 x PVC or silicone hose, 1/2″ ID, 3/4″ OD, 1” Length (I got this from my LHBS)
- 1 x Teflon Tape
Then you just need two standard 3/16″ ID beer lines about 5′ each. One will have a beverage out connection, and the other will have a faucet or faucet connection.
Assembly
1. Measure and Cut the Stainless Steel Tube

This is important. You don’t want the tube to be too short because it won’t seal properly, and you don’t want it to be too long because then you obviously can’t screw the cap on tight. Mine ended up being right around 10 1/8″.
Place the tube in both the top and bottom ports in the filter housing and take a conservative measurement, cut, and repeat until the cap screws on tight and the bottom of the tube is touching or just about touching the bottom of the housing. I used a table saw to cut the tube, but a hacksaw will work just fine.
2. Drill Holes in the Tube

Drill roughly 20 or so 1/8″ holes in the lower half of the tube. The Hash Back design calls for 1/16″ holes, but I’ve seen several other designs that had success with 1/8″ holes so that’s what I went with. I may make another pipe with 1/16″ holes and compare results, but that’s for later!
This step can be frustrating if you don’t have the proper equipment. A basic drill will work, but you’ll need something (or someone) to hold it in place while you drill the holes, and you’ll probably want to drill pilot holes first. A drill press and vise mount will make this a snap.
3. De-burr the Tube

You don’t want metal filings in your beer, and the thought of sharp metal hurting my precious beverage makes me cringe. Use a Dremel, bench grinder, drill bit, or some other tool to smooth out the tube.
4. Clean Everything

Soak everything in soapy water or OxiClean before use.
5. Attach the Fittings

Shove the 1” piece of PVC or silicone tubing in the center well of the filter cap. This will act as a gasket for the stainless steel tube.
Wrap the flares or hose barbs a few times with Teflon tape and screw into the cap threads. Hand tighten and then use a wrench give it just a little extra. You don’t want to over-tighten or the cap might crack, but you want a solid seal to help reduce foaming.
6. Attach the Lines

As mentioned before, you’ll have two beverage lines. Connect the faucet line to the Randall’s OUT port, and the keg line to the Randall’s IN port. Make sure the connections are solid.
Now you’re ready to rock and roll!
Usage
It’s worth noting right up front that you’re going to get the best results from higher-alcohol beer, as the alcohol helps strip the flavor and aroma from the ingredients.
Once you’ve figured out which beer you want to enhance, do the following:
- Insert the stainless tube holes down into the well at the bottom of the filter housing
- Place whatever ingredients you’ve chosen to infuse your beer with around the tube in the filter housing. Whole leaf hops are a great choice, particularly those you might use for late additions or dry hopping like Citra, Cascade, Centennial, etc. But don’t limit yourself to hops. You can use just about anything from fruit to spices to Reese’s peanut butter cups. Throw in some coffee beans to add another layer of complexity to your chocolate stout, or chop up a jalapeno to add some heat to your pale ale. The possibilities are endless! Read this article for more suggestions.
- Carefully line up the cap gasket with the tube and screw on tightly
- Prime the Randall with beer:

- If you’re using quick disconnects, this is a great way to prime the Randall. By sending the beer into the Randall through the OUT port, you avoid the possibility of beer leaking out through the red pressure release cap at the top
- If you’re not using quick disconnects, leave the connections as is and very carefully use the red pressure release valve on the cap to regulate the flow as the chamber fills up.
- Wait a few minutes for the infusion to take place
- Open the faucet and enjoy!

The biggest problem with the single chamber design is foaming. The beer gets pretty agitated on the way through the Randall, so you may end up with a glass full of foam.
Here are some additional tips for foam reduction:

Chill the Randall. Similar to the recommendation of chilling bottles prior to filling from the keg, a chilled Randall, chilled lines, and chilled ingredients will make the beer much happier upon contact.
Stick the whole contraption in the kegerator or fridge for awhile prior to use for best results.
Find the Right PSI. You need enough pressure to push the beer all the way through, but you don’t want the beer flying into the Randall. It needs to be a gentle cascade over the ingredients and up through the tube. Play around with the PSI until you find the right balance.
Fully Open the Faucet. A slightly-opened faucet will agitate the beer and cause foaming. Since the Randallized beer will already be a little angry, make sure to fully open the faucet when pouring!
Add a Settling Chamber. Foaming is what drove Dogfish Head to redesign the Randall and add a second chamber to allow foam to settle. Check out the next section for some visuals.
Double Barrel Randalls
Hardcore DIYers have come up with some pretty sweet double barrel designs that more resemble the Randall 3.0. They still utilize the same water filter housings, but they are mounted upside down so the beer flows in at the bottom.
After stripping the flavor and aroma from the ingredients in the first chamber, the beer flows to the second chamber where the foam can settle prior to dispensing.
This is one of the more impressive designs I’ve seen. Very cool, but a little too much for me. I can get great results with less equipment.
Show Me Your Randall
Whole house water filters dominate this DIY trend, but that doesn’t mean that’s the only way to do it. I’ve seen people build Randalls out of large stainless steel canisters, mason jars, even 5-gallon kegs!
Someone needs to go Superbad-style and make a Randall out of a laundry detergent jug. Perhaps a garden watering can?
Maybe just pick up a Mac Daddy inline filter?
Have you built a Randall? Did you follow an existing design or build yours from scratch?
Let us know in the brewers fb group. I’d love to see your version of an organoleptic hop transducer module.
Todd is a man of many hobbies. Obstacle course racing, programming, cooking, snowboarding, thinking of random business ideas, weight-lifting, beards, and most recently homebrewing. With little time to become a full-fledged beer geek, Todd focuses on the practical side of brewing. He’s always looking for ways to improve his process and shorten the brew day without sacrificing quality or control. Todd is an up-and-comer in the exploding Richmond, VA craft beer scene.
![Shipping Beer Like a Pro: Safely and Legally [Must-Know Tips]](https://homebrewacademy.com/wp-content/uploads/How-to-Ship-Beer-What-You-Need-to-Know-768x430.png)
![Fermentor vs Fermenter: What’s the Difference? [Quick Guide]](https://homebrewacademy.com/wp-content/uploads/Fermentor-vs-Fermenter-Homebrew-Academy-768x432.png)


