DIY Counterflow Wort Chiller
Let me start with a warning: This project is not for everyone. It involves more knowledge than the average DIY project and it will take up a lot of time.
I built this wort chiller for just under $50, but I already had all of the tools and the stainless fittings.
Like most homebrewers, I started out cooling wort in a sink filled with ice. It wasn’t long before I decided that that just would not do.
So I built my first counterflow wort chiller. I made it out of a copper tube, water hose, and a few copper fittings. This first chiller took up a lot of room, so I decided to look into other options.
One option that caught my eye was the Exchilerator Wort Chiller.
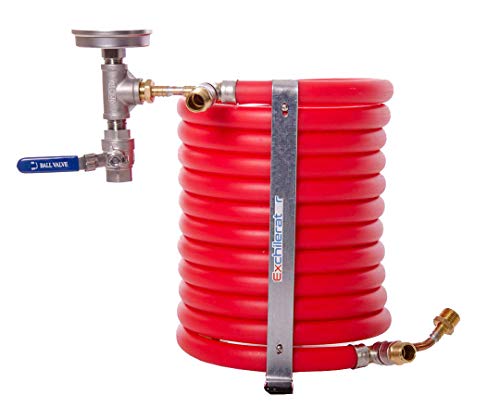
I was not, however, a fan of the price tag. After some thought I had a wild notion: Maybe I could build one myself.
Of course, the pre-made version is made with a convoluted tube and I have no way to do that, but I had some Ideas.
Before we delve too far into the construction process I would like to hit the basics of how a counterflow chiller works.
The construction is simple. It consists of a tube inside of a shell which is simply another tube. One fluid is pumped in one direction through the shell and another fluid is pumped in the opposite direction (counter-flow) through the tube as the two fluids pass each other they exchange their heat.
Boiling wort from your boil kettle is pumped in one direction through the chiller and fluid (typically water) is pumped the opposite direction absorbing the heat from the wort.
Here is the list of parts you will need for this project:
- (1) 10 foot ¾ inch copper pipe
- (1) 10 foot ½ inch copper pipe
- (2) ¾ – ½ – ½ reducing tees
- (4) ½ to ½ NPT threaded fittings
- (2) ½ 90 degree elbows
- ~2 lbs of table salt
- 25 feet of 12 gauge copper wire
Tools you may need for this project:
- Wire Strippers
- Wire Cutter
- Pipe Reamer
- Pipe Cutter
- Steel Brush/ Fine Sand paper
- Metal File
- Blow Torch / Gas (I used MAP gas)
- Solder
- Flux and something to apply it.
- Tape (i used blue masking tape)
Tube and shell construction
I used a ¾ inch pipe for my shell pipe and a ½ inch pipe for my tube. I used water grade copper pipe throughout the project.
To be able to bend the pipe with another pipe in it I filled the two pipes with salt to keep them from collapsing on themselves.
To combat the convoluted copper idea, which gives the inside tube more surface area for temperature transfer, I decided to wrap the inside tube with wire and lower the clearance between the tube and shell.

This should force the water in the shell to move in a circular fashion around the tube, thus, in theory, giving the water more contact time (not as efficient as the convoluted pipe but a trade off for doing it myself).
Prep:
- Use a metal file to file away the stop in the reducing tee.

- Mark both ends of the tube where the shell outlets will be.Ensure there is at least an inch of the tube from the end of each tee.
 These marks will serve as a start and end points for the wire that wraps around.
 - Strip the protective coat from roughly 25 feet for the 12 gauge THHN Solid copper wire.

 These marks will serve as a start and end points for the wire that wraps around.
Steps:
- Solder one end of the stripped wire to the tube where you made the outlet mark and begin to wrap it around the outer diameter of the tube. Your wraps should be about one inch apart and tight. To maintain tension I pulled tight and soldered the wire to the tube at one foot intervals.

- Insert the tube into the shell.
- Fill the tube with salt. Pour slowly to avoid air pockets. After salt begins to flow from tube I taped the end and filled the rest of the pipe. Using a sander to provide some vibration, I packed the salt. Once the tube is full and packed tape off the other end. It is now time to fill the shell with salt.

- Fill the shell with salt. This step will take patience. A lot of patience. The best method I found was to tape a funnel to one end and after filling it with salt I would rotate the pipe. The fact that the wire was twisted around the tube helped it act like a screw and allowed the salt to move down the shell.
 When you have filled the tube and shell with salt and there are no air pockets left you can tape off both ends.


 When you have filled the tube and shell with salt and there are no air pockets left you can tape off both ends.
Bending the copper
You will need a form to bend the pipe around. I used some scrap 4.5 inch iron pipe. You will need a way to affix the copper to the form to start the bend, a “C” clamp on the open end of the form pipe could work, for me I was able to wedge the copper pipe between the form and the tractor implement that was holding the form upright.
Make sure you save yourself about six inches of pipe that is straight on each end of the coil.
I tried (and failed) to bend the copper cold, even with the salt the pipe still kinked. After failing twice and losing three feet of the chiller’s overall length, I decided to use heat.
I will say that this is not a one person job, you need at least two, one to heat the pipe, and another to apply light constant pressure. So… I enlisted the help of my dad.

We slowly heated up the shell until it started changing colors with the heat. You want to make sure you move the flame and don’t keep it in one place too long or you will burn a hole in the copper. Learn from my mistakes, I did this, and had to patch it with solder.
Once the pipe was changing colors slight and constant pressure was applied to the pipe and the flame was moved forward. The idea is to have enough heat to bend the pipe but not to much to form kinks.

As the pipe begins to bend the person applying pressure will be in charge guiding it and keeping the bend tight.
Keep the flame close to the form and if kinks start to form stop applying pressure and allow it to heat up again. Keep moving around the form until you run out of pipe. For me this process was over an hour and a half.
Adding the ends
The interior tube should extend out past the exterior shell and to achieve this you will most likely have to use a pipe cutter to remove some of the shell. After you remove the cut portion of the shell, you can clip the wire if it is in the way of the tee sliding onto the end of the shell.

Finish one full end and use water pressure from the water hose to clean out the salt before finishing the other end.
Here are the steps to add an end to the chiller:
Prep:
- Cut two small pipes from ½ inch copper tube. The length of these tubes is dependant on how you want your end product to look and or the size of your connection equipment. The length I used was 2.5 inches for both.
- Clean and debur all of the fittings and pipes.
- Make sure you apply flux to all joints as you attach them.
Steps:
- Insert the tube into the reducer tee and allow the tee to fit over the shell.


- Insert one of the small pipes into the open reducer openings.
- Put the 90 degree elbow on that pipe.
- Insert the other small pipe into the elbow.
- Place the ½ npt threaded endings onto both open ends.
- Solder all of the joints.


Once you have soldered all of the joints you can attach your favorite connector and hook it up to a water hose. I use stainless cam locks in my setup so that is what I used.

Turn on the water and wait for a while. The water should dissolve the salt and within a few minutes you should have water coming out from the other end. Now place the hose on the other inlet and clean out that side as well.

You can see in this picture that the idea of the water moving in a circular path around the tube worked out.
When you have cleaned out both the tube and shell of the chiller you can attach the other end in the same fashion.

If you have leaks at your joints you will need to resolder. To test the tubes for leaks you can close off one end and apply water pressure. If water comes out of the shell inlets you burned a hole in your tube or kinked it in the bending process.
Once it was free of leaks I used one of my process hoses to create a loop from the outlet of the tube and the inlet of the shell. I ran the water through it for about 15 minutes just to clean it out.

Use and testing
To test this chiller I decided to recirculate boiling water through the tube until it was equal to the groundwater temperature which was going through the shell.
The ambient air temperature was 85F.
The groundwater temperature was 80F.
I boiled 9 gallons of water.
Due to some pump priming issues, I did not start the test until the water had already cooled to 185F.
During my test I started with the pumps half open after about 15 minutes I opened them to about 75% and then after 23 minutes I opened it to 100%. This was to try to increase contact time between the fluids.
Within 10 minutes the chiller dropped the 9 gallons from 185F to 111F.
After 15 minutes the temperature was 98F.
At 30 minutes the temperature was 82F and it didn’t seem to want to fall any more.
This was just for the test. On a normal brew day, once the chiller had the wort to ~100F, I would switch the groundwater with ice water from my mash tun and using a second pump I would recirculate that.
In this test the chiller got to 100F in just under 15 minutes. The ice water would take another 5 to get to 65F which is typically where I pitch.
[if there is time, test the same way RB did in his test with one pass and see what the temp gets down to with one pass.]
Conclusion

As I stated before this project is not for everyone. All in all you can build this for under $50 if you already have the tools and even though the price tag is appealing you should plan to spend a few weekends working on it. The real question you have to ask yourself is: how much is my time worth?
If you just want to have a new project then, by all means go for it. However, if you are not the greatest DIY’er or do not have the knowledge to do the tasks involved it would probably be advantageous to go with a commercial version of this project.
There is always more than one way to skin a cat, this is just the way I did it (no animals were harmed to create this chiller). Not all of these ideas are original, in fact, most of them came from other forum posts and/or commercial products available.
Have you made your own counter flow chiller? Would you convert an immersion chiller into one?
Do you think the convoluted copper is worth it? To buy, or to DIY – isn’t that always the question.
Alex is a family man from Texas. He finds as many ways to mix his hobbies together which include electronics, woodworking, anything DIY, and of course homebrewing. He has progressed from kit beers to partial mash and has recently made the move to all-grain. He enjoys creating his own recipes and learning how each part of the process changes them.


