
Building The Ultimate Home Brewery: Crafting Your Beer Paradise

The Craft Beer Channel is a popular YouTube channel and website all about homebrewing, craft beer recipes, reviews, and brewery tours. Hosted by Johnny Wills, it has over 100k subscribers and millions of video views.
The channel had always filmed videos ad hoc – often at Johnny’s dining room table. He decided it was time to create a dedicated studio space with a brewery on-site. This would allow for better quality and consistency for their videos, plus the ability to brew beers and demonstrate recipes.
Johnny embarked on an ambitious project to build this ultimate studio and brewery in his small backyard. This post will detail the entire process from initial planning to the final reveal.
Planning the Space

The backyard space Johnny had to work with was quite small – only about 10 meters deep and 3 meters wide. It was also constrained on one side by his neighbor’s fence.
After researching options for having a prefabricated building installed, even small homes or office pods started around £15-20k – way over his budget of £6-7k.
So Johnny decided he would take on the project himself and build the structure from the ground up. This would entail:
- Clearing the area of trees, plants, and existing patios
- Grading and leveling the dirt
- Pouring a concrete foundation
- Framing the walls and roof
- Finishing the exterior with siding and roofing
- Insulating everything
- Installing electricity and possibly water lines
None of these were skills Johnny had experience with. But he was excited to learn some new DIY and construction skills. The process would certainly be filled with lessons and probably some mishaps along the way too!
Building the Structure

Johnny started by removing all the trees, shrubs, plants, and decomposing lower patio in the space. This clearance made it apparent just how small the footprint was going to be.
Next he had to take a mattock and shovel to the ground, flattening it out and getting it prepped for the foundation. Johnny was meticulous about grading and leveling, since any imperfections would get amplified when building on top.
After laying down a gravel base, Johnny assembled the custom formed concrete foundation. He rented the tools needed like a concrete mixer and levelling bar. The foundation went smoothly, but Johnny discovered air pockets in a few sections.
With the foundation curing, it was time for the big task – erecting the walls, rafters, and roof. Johnny used a kit that provided all the pre-cut lumber and metal roofing along with detailed instructions.
It was reminiscent of IKEA furniture assembly, but much more complex. Each piece had to be precisely measured and cut to fit. Johnny used levels, squares, clamps, and other tools he purchased for the project.
Even with great care, there were invariably slight gaps or pieces that didn’t join correctly. Johnny got creative with remedies like using cedar strips to cover problem joints. After much patience and troubleshooting, the basic shell stood fully enclosed.
Designing the Interior

With the blank canvas of the indoor space, Johnny sketched ideas for how he wanted to lay out the interior and maximize the footprint:
- A desk positioned by the window where he could film videos on his laptop with ample natural lighting. He covered the wall behind with sound dampening foam panels.
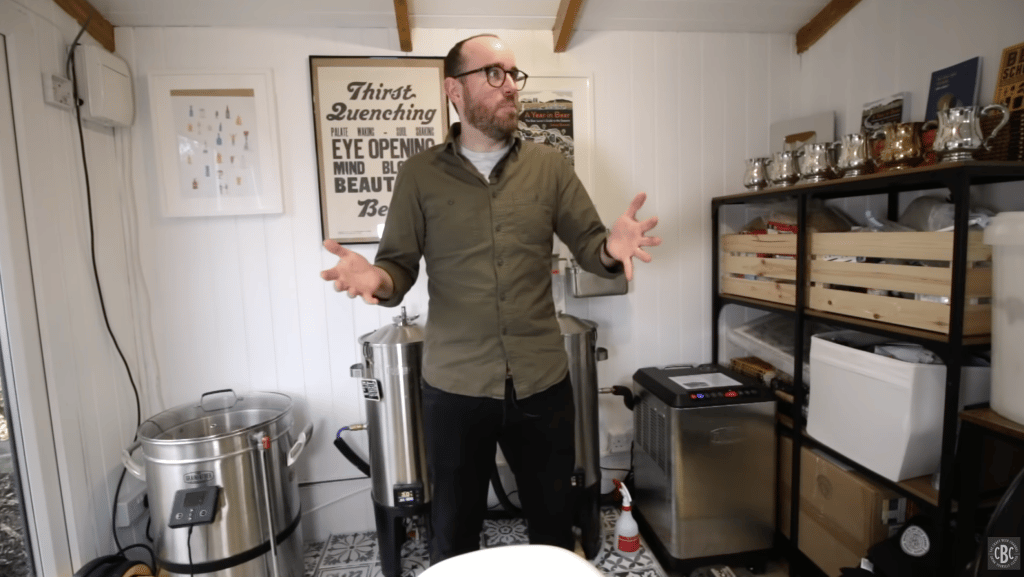
- The brewery setup along the back wall, with two conical fermenters, a glycol chilling unit, and his Grainfather electric brewing system up on a stand.
- A section of tile flooring for the Grainfather to make it easy to hose down and keep clean. The tiles were installed on two raised platforms – one flat for the brewery and one sloped slightly to drain away water.
- Shelving throughout the remaining walls to display their published beer books, framed YouTube awards, and some brewery souvenirs Johnny collected from their travels.
- A small bar area in the corner to serve tasters of beers straight from the conicals. Unfortunately he didn’t get the draft system installed yet.
Figuring out placement for the hot liquor tank was tricky with the small footprint. Johnny devised a clever solution of putting it on a wheeled trolley that he could easily move around as needed while brewing.
The Grand Reveal

After many late nights working on tiling, painting, staining, and getting the studio fully insulated, Johnny did a dramatic walk from his house to unveil the finished space.
He was thrilled to show that the DIY build was now a functional, watertight structure complete with electricity, heating, and air conditioning.
Johnny gave a proud tour of the highlights: the podcasting corner, wall art display, ingredients/gear storage, tiled brewery floor, and the overall warm aesthetic with stained wood rafters and accent walls. It was an impressive transformation from the plain green shell!
First Brews
The conical fermenters were already filled with test batches – a Munich-style pilsner made with floor malted Bohemian barley and aromatic Czech Saaz hops, and a classic West Coast IPA.
Johnny teased on social media that a special guest would help brew the IPA. That eventual reveal came at the end of the video – rock icon Sammy Hagar would join as a collaboration.
Conclusion
Despite having no prior experience with construction or home renovations, Johnny was thrilled to have tackled every step of the project mostly solo on a modest £6k budget.
All the challenges and problem-solving along the way made it an extremely rewarding DIY. The backyard brewery and studio still needed a few cosmetic touches. But the heavy lifting was done – it was now a fully functional space for filming YouTube videos and brewing creative new beers with friends like Sammy Hagar!
Johnny couldn’t wait to put his new space and skills to use in upcoming videos on The Craft Beer Channel.


Lead marketer, brewer, dad, and husband. Pretty much an all-round awesome guy. Self proclaimed coffee addict who’s been home brewing beer (among other things) for 25+ yrs. Also an aspiring pro-brewer and micro-brewery owner!


![Best Beer Coolers [Recommended in 2024]](https://homebrewacademy.com/wp-content/uploads/The-Best-Beer-Coolers-to-Get-Keep-Your-Brew-Colder-for-Longer-768x432.jpg)

